Flutter: การใช้งาน Stack เพื่อซ้อน widgetเบื้องต้น

Stack เป็น widget layout ที่มีประโยชน์มาก ๆ เพราะในการใช้งานจัด UI มันไม่ได้มีแค่การเอา widget ไปเรียงต่อกันไปเรื่อย ๆ แต่มันมีแบบเอามาซ้อนทับกันด้วย ตัว Stack จะช่วยในเรื่องการเอา widget ที่ต้องการมาเรียงซ้อน ๆ กันได้ตามต้องการ

การสร้าง Stack

constructor มีรายละเอียดดังนี้

const Stack({
  Key? key,
  AlignmentGeometry alignment = AlignmentDirectional.topStart,
  TextDirection? textDirection,
  StackFit fit = StackFit.loose,
  Clip clipBehavior = Clip.hardEdge,
  List<Widget> children = const <Widget>[],
})

ตัว widgets ที่จะเอามาเรียงซ้อนกันให้กำหนดใน children ในการระบุตำแหน่งและขนาดของ widget ที่จะเอามาเรียงจะให้ Positioned เพื่อกำหนด left right top bottom width height ที่ต้องการ

การใช้งานทั่วไป

การวาด Stack ต้องเข้าใจว่าตัวมันจะแค่ช่วยเรียง widget แบบ layer ที่ใช้ในโปรแกรมแต่งภาพ widget ตัวแรกจะอยู่ล่างสุด ตัวสุดท้ายจะอยู่บนสุด ตัวอย่าง จะลองวาดกล่อง 3 ขนาด จะเห็นว่าตัว 150x150 จะถูกทับด้วยกล่อง 80x80 และ 60x60 ทุกกล่องจะอยู่ที่มุมบนซ้ายมือ

import 'dart:math';
import 'package:flutter/material.dart';

void main() {
  bgColor() => Color(Random().nextInt(0xFFFFFF)).withOpacity(0.5);

  box(double w, double h) => Container(
      width: w,
      height: h,
      color: bgColor(),
      child: Center(child: Text('$w x $h')));

  var stack = Container(
      width: 200,
      height: 200,
      color: Colors.green,
      child: Stack(children: [box(150, 150), box(80, 80), box(60, 60)]));

  runApp(MaterialApp(
    home: Scaffold(
      body: stack,
    ),
  ));
}
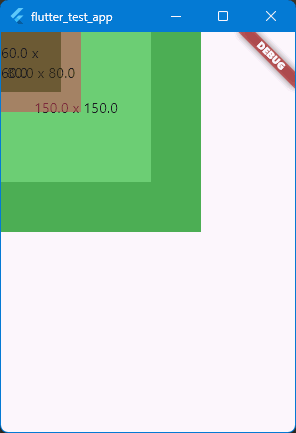
ตัวอย่างการใช้ Stack

ลองเลื่อนกล่อง 60x60 มาอยู่ชิดซ้ายขอบล่างสุด โดยใช้ Positioned ดู

  var stack = Container(
      width: 200,
      height: 200,
      color: Colors.green,
      child: Stack(children: [
        box(150, 150),
        box(80, 80),
        Positioned(bottom: 0, child: box(60, 60))
      ]));

การกำหนดรูปแบบการวาง widgets ด้วย alignment

ค่าเริ่มต้นในการวาง widgets คือ AlignmentDirectional.topStart ผู้ใช้งานสามารถกำหนดเป็นค่าอื่นได้ดังนี้

  • topStart
  • topCenter
  • topEnd
  • centerStart
  • center
  • centerEnd
  • bottomStart
  • bottomCenter
  • bottomEnd

หาก widgets ตัวไหนไม่ได้มีการใช้ Positioned ครอบเอาไว้ ก็จะใช้ค่าจาก alignment ในการวางตำแหน่ง ตัวอย่างลองวางไว้ตรงกลาง ตัวที่กำหนด Positioned ไว้แค่แกนเดียว (ในตัวอย่างคือ bottom) จึงมีผลทำให้มันเลื่อนมาอยู่ตรงกลางในแนวนอนด้วย

  var stack = Container(
      width: 200,
      height: 200,
      color: Colors.green,
      child: Stack(alignment: AlignmentDirectional.center, children: [
        box(150, 150),
        box(80, 80),
        Positioned(bottom: 0, child: box(60, 60))
      ]));
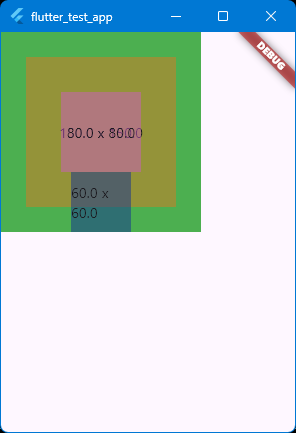
ตัวอย่างการใช้ alignment

นอกจากนี้ยังสามารถใช้งาน Alignment และ FractionalOffset ก็ได้เช่นกัน ลองดูวิธีใช้ใน Align ตัวจัดตำแหน่ง สามารถระบุขอบ หรือระยะ offset ก็ได้

กำหนดค่า StackFit เพื่อกำหนดค่า constraints ให้กับ widgets

ค่า fit จะเป็นการส่งค่า constraints ไปให้ตัว widgets ที่อยู่ข้างในว่าจะให้มีพฤติกรรมในการกำหนดขนาดของตัวมันอย่างไร ค่าเริ่มต้นจะเป็น StackFit.loose จะเป็นการไม่ระบุค่า minimum width และ minimum height ตัวอย่าง StackFit.loose

  var stack = Container(
      width: 200,
      height: 200,
      color: Colors.green,
      child: Stack(fit: StackFit.loose, children: [
        box(150, 150),
        box(80, 80),
        Positioned(bottom: 0, child: box(60, 60))
      ]));
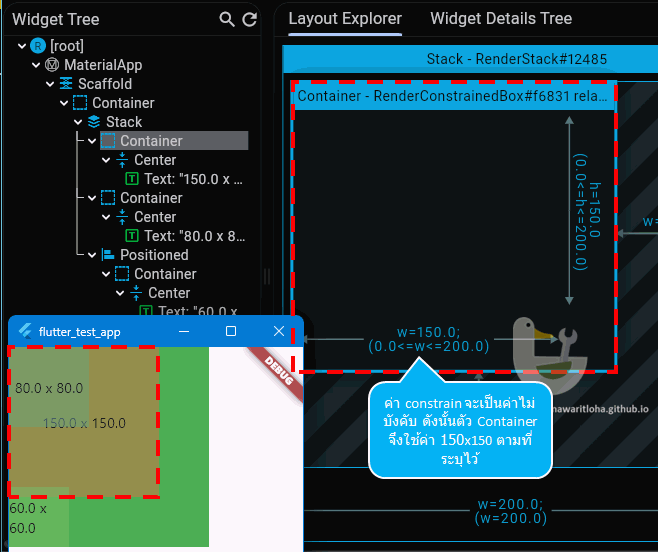
กำหนด fit: StackFit.loose

ถ้ากำหนดค่าเป็น StackFit.expand ตัว Stack จะส่งค่า constraints เป็นค่า max ของแต่ละด้านไปแทน บังคับให้ widgets มีขนาดขยายจนเต็มพื้นที่ Parent ตามที่กำหนด(ถ้าทำได้) ผลจากการใช้จะทำให้ตัว box() ที่ไม่ได้ครอบด้วย Positioned ขยายใหญ่จนเต็ม
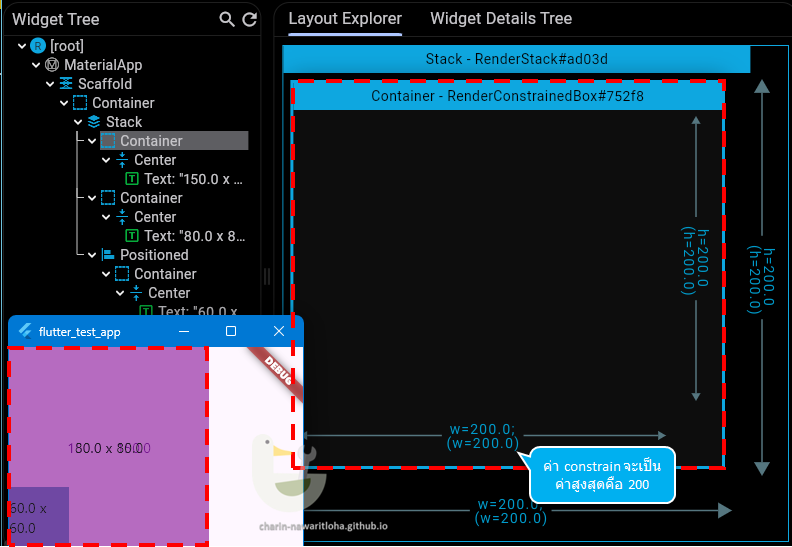
กำหนด fit: StackFit.expand

อันสุดท้ายคือ StackFit.passthrough คือส่งค่า constraints จาก Parent ไปยัง widgets โดยตรง

เมื่อ widgets แสดงผลเกินพื้นที่ Stack

ค่าเริ่มต้นหากมี widgets แสดงผลเกินกว่าพื้นที่ Stack คือ clipBehavior = Clip.hardEdge คือ ตัดส่วนที่เกินทิ้ง โดยไม่มีการทำ anti-aliasing (ลดความหยักของขอบที่โดนตัด) ตัวอย่าง ลองกำหนดค่าให้ widget ทะลุตัว Stack ออกไป

  var stack = Container(
      width: 200,
      height: 200,
      color: Colors.green,
      child: Stack(children: [Positioned(top: 0, child: box(300, 60))]));
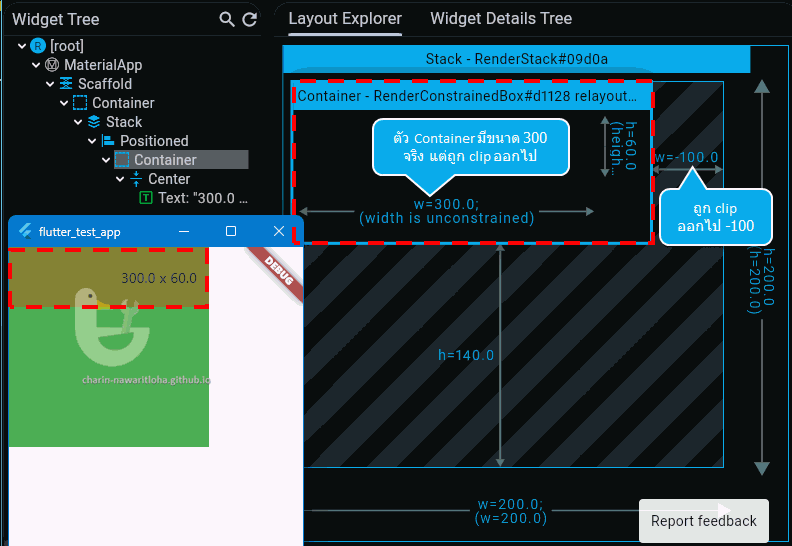
ตัวอย่างการ Clip.hardEdge

หากไม่ต้องการให้มีการตัดส่วนของ widgets ที่เกินออกไปให้ใช้ค่า clipBehavior: Clip.none

  var stack = Container(
      width: 200,
      height: 200,
      color: Colors.green,
      child: Stack(
          clipBehavior: Clip.none,
          children: [Positioned(top: 0, child: box(300, 60))]));
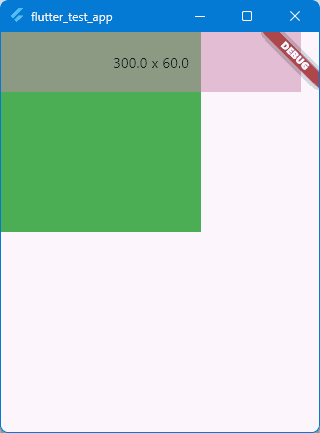
ตัวอย่างการ Clip.none

ค่าอื่น ๆ ของ Clip

ตัวอย่างการใช้ Stack

ผู้ใช้สามารถวาด widgets ให้ซ้อนกันได้ เพื่อใช้ในงานตกแต่งต่าง ๆ ได้

import 'package:flutter/material.dart';

void main() {
  var bgColor = Colors.white;

  var stack = SizedBox.square(
      dimension: 200,
      child: Stack(alignment: Alignment.center, children: [
        Padding(
            padding: EdgeInsets.all(10.0),
            child: Container(
                decoration: BoxDecoration(
                    borderRadius: BorderRadius.all(Radius.circular(8.0)),
                    border: Border.all(color: Colors.black45)))),
        Positioned(
            left: 24.0,
            top: 0,
            child: Container(
                color: bgColor,
                padding: EdgeInsets.only(left: 4, right: 4),
                child: Text('Title here'))),
        Positioned(
            right: 24,
            top: 3,
            child: Container(
              color: bgColor,
              child: Icon(Icons.close, size: 16, color: Colors.red),
            )),
        FlutterLogo(size: 120)
      ]));

  runApp(MaterialApp(
    home: Scaffold(
      backgroundColor: bgColor,
      body: stack,
    ),
  ));
}
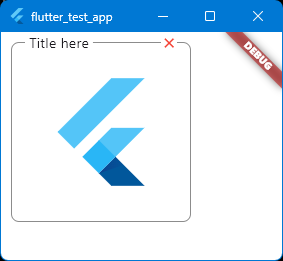
ผลที่ได้จากตัวอย่าง


# Flutter: การใช้งาน Stack เพื่อซ้อน widgetเบื้องต้น !![](0000) [Stack](https://api.flutter.dev/flutter/widgets/Stack-class.html) เป็น widget layout ที่มีประโยชน์มาก ๆ เพราะในการใช้งานจัด UI มันไม่ได้มีแค่การเอา widget ไปเรียงต่อกันไปเรื่อย ๆ แต่มันมีแบบเอามาซ้อนทับกันด้วย ตัว Stack จะช่วยในเรื่องการเอา widget ที่ต้องการมาเรียงซ้อน ๆ กันได้ตามต้องการ ## การสร้าง Stack constructor มีรายละเอียดดังนี้ ```dart const Stack({ Key? key, AlignmentGeometry alignment = AlignmentDirectional.topStart, TextDirection? textDirection, StackFit fit = StackFit.loose, Clip clipBehavior = Clip.hardEdge, List children = const [], }) ``` ตัว widgets ที่จะเอามาเรียงซ้อนกันให้กำหนดใน `children` ในการระบุตำแหน่งและขนาดของ widget ที่จะเอามาเรียงจะให้ [Positioned](https://api.flutter.dev/flutter/widgets/Positioned-class.html) เพื่อกำหนด left right top bottom width height ที่ต้องการ ## การใช้งานทั่วไป การวาด Stack ต้องเข้าใจว่าตัวมันจะแค่ช่วยเรียง widget แบบ layer ที่ใช้ในโปรแกรมแต่งภาพ widget ตัวแรกจะอยู่ล่างสุด ตัวสุดท้ายจะอยู่บนสุด ตัวอย่าง จะลองวาดกล่อง 3 ขนาด จะเห็นว่าตัว 150x150 จะถูกทับด้วยกล่อง 80x80 และ 60x60 ทุกกล่องจะอยู่ที่มุมบนซ้ายมือ ```dart import 'dart:math'; import 'package:flutter/material.dart'; void main() { bgColor() => Color(Random().nextInt(0xFFFFFF)).withOpacity(0.5); box(double w, double h) => Container( width: w, height: h, color: bgColor(), child: Center(child: Text('$w x $h'))); var stack = Container( width: 200, height: 200, color: Colors.green, child: Stack(children: [box(150, 150), box(80, 80), box(60, 60)])); runApp(MaterialApp( home: Scaffold( body: stack, ), )); } ``` !![ ตัวอย่างการใช้ Stack ](0100) ลองเลื่อนกล่อง 60x60 มาอยู่ชิดซ้ายขอบล่างสุด โดยใช้ [Positioned](https://api.flutter.dev/flutter/widgets/Positioned-class.html) ดู ```dart var stack = Container( width: 200, height: 200, color: Colors.green, child: Stack(children: [ box(150, 150), box(80, 80), Positioned(bottom: 0, child: box(60, 60)) ])); ``` ## การกำหนดรูปแบบการวาง widgets ด้วย alignment ค่าเริ่มต้นในการวาง widgets คือ [AlignmentDirectional.topStart](https://api.flutter.dev/flutter/painting/AlignmentDirectional/topStart-constant.html) ผู้ใช้งานสามารถกำหนดเป็นค่าอื่นได้ดังนี้ - topStart - topCenter - topEnd - centerStart - center - centerEnd - bottomStart - bottomCenter - bottomEnd หาก widgets ตัวไหนไม่ได้มีการใช้ Positioned ครอบเอาไว้ ก็จะใช้ค่าจาก [`alignment`](https://api.flutter.dev/flutter/widgets/Stack/alignment.html) ในการวางตำแหน่ง ตัวอย่างลองวางไว้ตรงกลาง ตัวที่กำหนด Positioned ไว้แค่แกนเดียว (ในตัวอย่างคือ bottom) จึงมีผลทำให้มันเลื่อนมาอยู่ตรงกลางในแนวนอนด้วย ```dart var stack = Container( width: 200, height: 200, color: Colors.green, child: Stack(alignment: AlignmentDirectional.center, children: [ box(150, 150), box(80, 80), Positioned(bottom: 0, child: box(60, 60)) ])); ``` !![ ตัวอย่างการใช้ alignment ](0300) นอกจากนี้ยังสามารถใช้งาน [Alignment](https://api.flutter.dev/flutter/painting/Alignment-class.html) และ [FractionalOffset](https://api.flutter.dev/flutter/painting/FractionalOffset-class.html) ก็ได้เช่นกัน ลองดูวิธีใช้ใน [Align ตัวจัดตำแหน่ง สามารถระบุขอบ หรือระยะ offset ก็ได้](20241122_flutter_layout.html#:~:text=Align%20%E0%B8%95%E0%B8%B1%E0%B8%A7%E0%B8%88%E0%B8%B1%E0%B8%94%E0%B8%95%E0%B8%B3%E0%B9%81%E0%B8%AB%E0%B8%99%E0%B9%88%E0%B8%87) ## กำหนดค่า StackFit เพื่อกำหนดค่า constraints ให้กับ widgets ค่า `fit` จะเป็นการส่งค่า constraints ไปให้ตัว widgets ที่อยู่ข้างในว่าจะให้มีพฤติกรรมในการกำหนดขนาดของตัวมันอย่างไร ค่าเริ่มต้นจะเป็น [StackFit.loose](https://api.flutter.dev/flutter/rendering/StackFit.html#loose) จะเป็นการไม่ระบุค่า minimum width และ minimum height ตัวอย่าง `StackFit.loose` ```dart var stack = Container( width: 200, height: 200, color: Colors.green, child: Stack(fit: StackFit.loose, children: [ box(150, 150), box(80, 80), Positioned(bottom: 0, child: box(60, 60)) ])); ``` !![ กำหนด `fit: StackFit.loose` ](0400) ถ้ากำหนดค่าเป็น [StackFit.expand](https://api.flutter.dev/flutter/rendering/StackFit.html#expand) ตัว Stack จะส่งค่า constraints เป็นค่า max ของแต่ละด้านไปแทน บังคับให้ widgets มีขนาดขยายจนเต็มพื้นที่ Parent ตามที่กำหนด(ถ้าทำได้) ผลจากการใช้จะทำให้ตัว box() ที่ไม่ได้ครอบด้วย Positioned ขยายใหญ่จนเต็ม !![ กำหนด `fit: StackFit.expand` ](0500) อันสุดท้ายคือ [StackFit.passthrough](https://api.flutter.dev/flutter/rendering/StackFit.html#passthrough) คือส่งค่า constraints จาก Parent ไปยัง widgets โดยตรง ## เมื่อ widgets แสดงผลเกินพื้นที่ Stack ค่าเริ่มต้นหากมี widgets แสดงผลเกินกว่าพื้นที่ Stack คือ `clipBehavior = Clip.hardEdge` คือ ตัดส่วนที่เกินทิ้ง โดยไม่มีการทำ anti-aliasing (ลดความหยักของขอบที่โดนตัด) ตัวอย่าง ลองกำหนดค่าให้ widget ทะลุตัว Stack ออกไป ```dart var stack = Container( width: 200, height: 200, color: Colors.green, child: Stack(children: [Positioned(top: 0, child: box(300, 60))])); ``` !![ ตัวอย่างการ Clip.hardEdge](0600) หากไม่ต้องการให้มีการตัดส่วนของ widgets ที่เกินออกไปให้ใช้ค่า `clipBehavior: Clip.none` ```dart var stack = Container( width: 200, height: 200, color: Colors.green, child: Stack( clipBehavior: Clip.none, children: [Positioned(top: 0, child: box(300, 60))])); ``` !![ ตัวอย่างการ Clip.none ](0700) ค่าอื่น ๆ ของ [Clip](https://api.flutter.dev/flutter/dart-ui/Clip.html#values) ## ตัวอย่างการใช้ Stack ผู้ใช้สามารถวาด widgets ให้ซ้อนกันได้ เพื่อใช้ในงานตกแต่งต่าง ๆ ได้ ```dart import 'package:flutter/material.dart'; void main() { var bgColor = Colors.white; var stack = SizedBox.square( dimension: 200, child: Stack(alignment: Alignment.center, children: [ Padding( padding: EdgeInsets.all(10.0), child: Container( decoration: BoxDecoration( borderRadius: BorderRadius.all(Radius.circular(8.0)), border: Border.all(color: Colors.black45)))), Positioned( left: 24.0, top: 0, child: Container( color: bgColor, padding: EdgeInsets.only(left: 4, right: 4), child: Text('Title here'))), Positioned( right: 24, top: 3, child: Container( color: bgColor, child: Icon(Icons.close, size: 16, color: Colors.red), )), FlutterLogo(size: 120) ])); runApp(MaterialApp( home: Scaffold( backgroundColor: bgColor, body: stack, ), )); } ``` !![ ผลที่ได้จากตัวอย่าง ](0800)