Flutter: Row Column Table เบื้องต้น
สำหรับ Layout แบบ single-child คิดว่าไม่น่าจะมีปัญหาเท่ากับ Multi-child layout widgets เนื่องวิธีจัดการของ Flutter framework นั้นจะทำการประมวลผลเรื่อง layout เพียงรอบเดียว ดังนั้นการที่ layout มี widget ที่ต้องการจัดการหลายตัว จึงจำเป็นต้องคุยกันเรื่อง ขนาด และต้องการกำหนดค่า constrains ที่ชัดเจน มิฉะนั้นจะไม่สามารถ render ได้ อย่างเช่น Row Column ที่จะมีไม่มีค่า constrains ส่งให้ตัว widgets ตัว widget แต่ละตัวต้องเป็นตัวกำหนดขนาดของตัวเองแล้วส่งไปให้ตัว layout ดังนั้นหากไม่ปฏิบัติตามหลักเรื่อง constrains จะทำให้เกิด error และไม่สามารถ render ตัว widget ได้
Row Column จัดแถว คอลัมน์
Row และ Column จะมีหลักการทำงานที่คล้ายกันมาก จุดที่แตกต่างกัน คือ Row จะเรียง widget เป็นแถวในแนวนอน ส่วน Column จะเรียงในแนวตั้ง โดยพฤติกรรมนี้จะเหมือนกับเอา Flex มาใช้งานโดยกำหนดทิศทางการเรียงให้ ในการใช้งาน layout ทั้งสอง ตัว widget ที่จะเอามาเรียงต้องระบุขนาดของตัวเองแล้วส่งไปให้ layout
- กำหนดแบบ absolute คือ กำหนดแบบค่าแน่นอน เช่น ใช้ SizedBox ระบุขนาดของ widget ที่จะเอาไปเรียงใน layout
- กำหนดแบบ relative คือ กำหนดแบบอัตราส่วน เช่น การใช้ Expanded หรือ Flexible เพื่อระบุว่าให้ใช้พื้นที่ของ layout ในอัตราส่วนเท่าไหร่
Row เรียงตามแนวนอน
constructor ของ Row
const Row({
  Key? key,
  MainAxisAlignment mainAxisAlignment = MainAxisAlignment.start,
  MainAxisSize mainAxisSize = MainAxisSize.max,
  CrossAxisAlignment crossAxisAlignment = CrossAxisAlignment.center,
  TextDirection? textDirection,
  VerticalDirection verticalDirection = VerticalDirection.down,
  TextBaseline? textBaseline,
  List<Widget> children = const <Widget>[],
})
หากใช้ค่าเริ่มต้น Row จะขยายด้านกว้างจนเต็ม Parent และจัด widget ไว้ทางซ้าย ลองมาดูตัวอย่าง เรียง Text ใน Row กัน จะเห็นว่าตัว widget จะไม่ทราบค่า width constrains
import 'package:flutter/material.dart';

void main() {
  runApp(const MaterialApp(home: Scaffold(body:
    Row(children: [Text('1'), Text('2')])
  )));
}
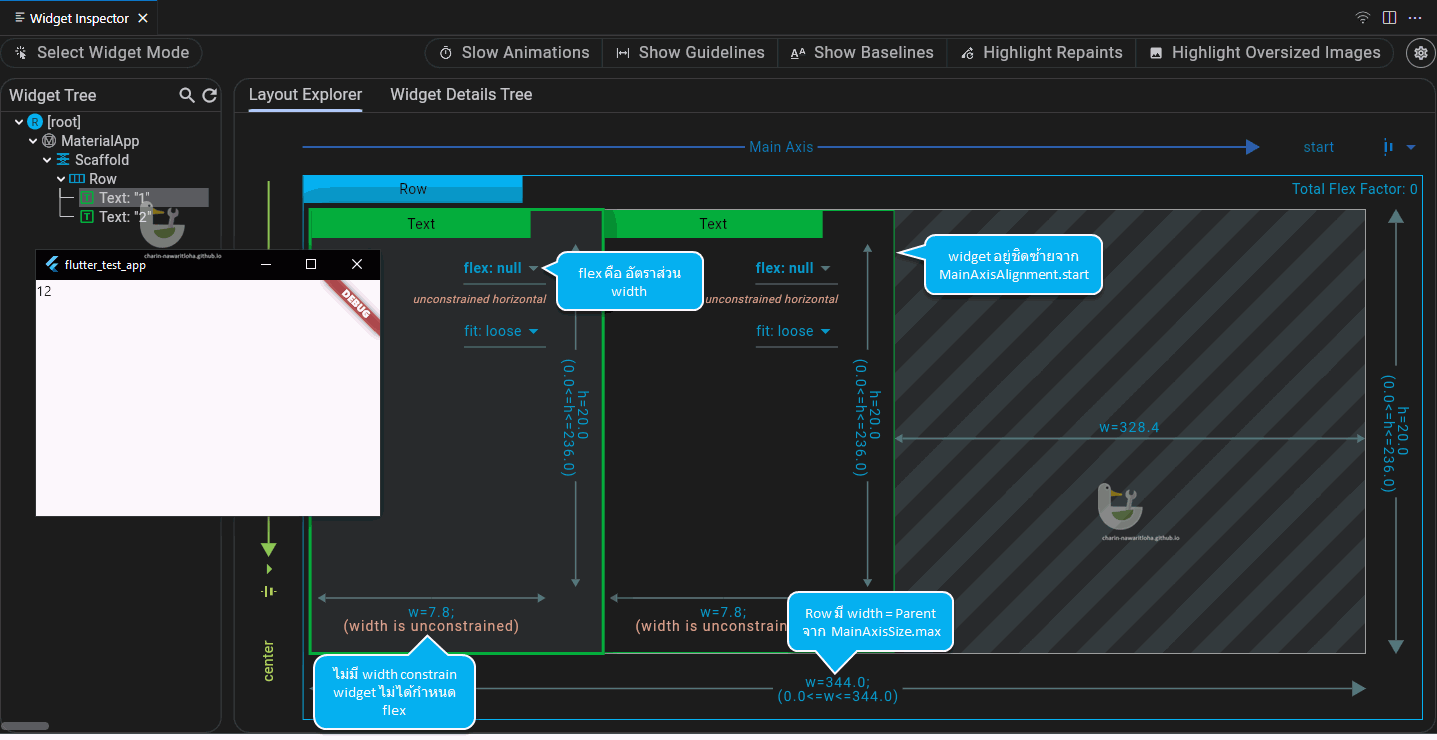
โครงสร้าง layout ของ Row
จะเกิดอะไรขึ้นหากใส่ widget ที่ตัวมันเองอาศัยค่า constrains จาก Parent เข้าไปใน Row
Row(children: [
  Text('1'),
  Text('2'),
  Container(color: Colors.yellow) //add yellow box
])
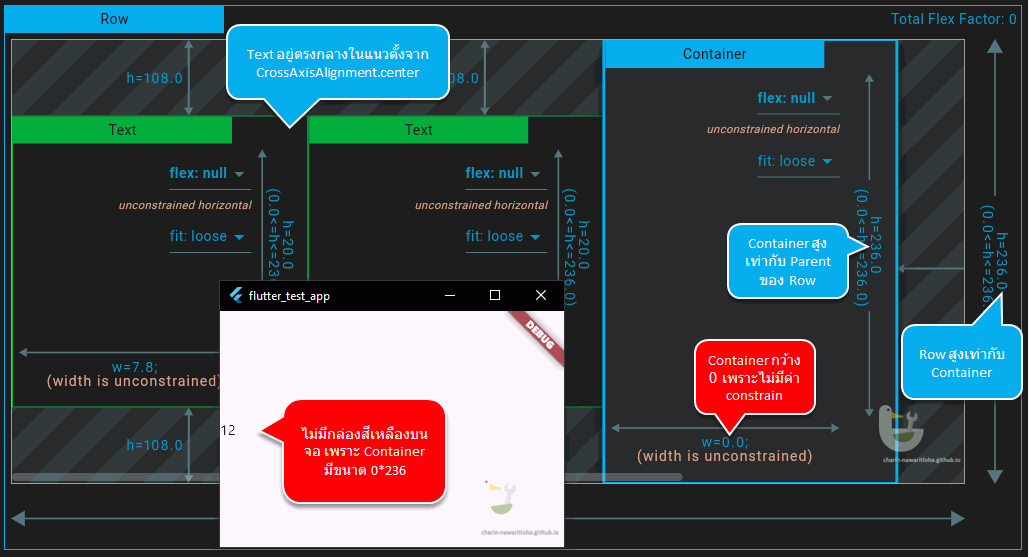
ไม่มีกล่องสีเหลืองบนจอ
จากตัวอย่างจะเห็นว่าการใช้งาน Row (และ Column) หากตัว widget ที่จะเอามาเรียง ไม่มีค่า size ในตัวมันเองเมื่อ render จะเกิดปัญหาเพราะส่ง Row ไม่ส่งค่า width constrains ไปให้ widget ที่จะ render ดังนั้นจึงจำเป็นต้องระบุค่า flex ผ่าน Flexible หรือ Expanded
Row(children: [
  Text('1'),
  Text('2'),
  Flexible(
    flex: 1,
    child: Container(color: Colors.yellow)
  )
])
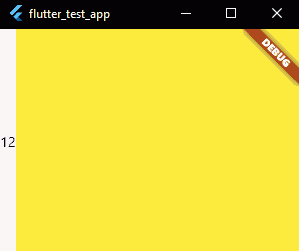
กล่องสีเหลืองขยายในพื้นที่ที่เหลือจนเต็ม
พอใส่ Flexible พบว่า Container แสดงบนจอแล้ว โดยแสดงจนเต็มพื้นที่ที่เหลือ ที่เป็นแบบนี้เพราะกระบวนการ render ของ Row และ Column มีดังนี้
- ทำการ Render ตัว widget ที่มีค่า flex = null หรือก็คือ widget ที่ไม่ได้ครอบด้วย Flexible หรือ Expanded โดยค่า constrains ที่ส่งไปให้จะมีเฉพาะส่วน height เท่านั้น ค่า width ตัว widget ต้องจัดการเอง
- พื้นที่ที่เหลือจากข้อ 1 จะถูกจัดสรรไปให้กับ widget ที่ระบุค่า flex มา โดยค่า flex จะใช้สำหรับคำนวณพื้นที่ที่แต่ละ widget จะได้รับ ดังนี้
- เอาค่า flex ของแต่ละ widget มาบวกกัน เช่น [A flex=1] [B flex=2] รวมกันได้ 3
- เอาค่าขนาดที่เหลือมาหารด้วยค่า flex ทั้งหมด เช่น เหลือ 300px หารด้วย 3 จะได้ 100px ต่อ flex
- ขนาดของ widget ที่จะได้รับคือเอาค่า flex คูณกับผลในข้อ 2. ดังนั้น ขนาดที่ได้จากข้อ 1. จะเป็น A=100px B=200px
Row(children: [
  Text('1'),
  Text('2'),
  Flexible(
    flex: 1,
    child: Container(color: Colors.yellow)
  ),
  Flexible(
    flex: 2,
    child: Container(color: Colors.green)
  )
])
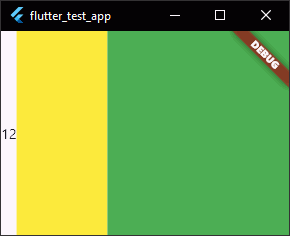
ความกว้างของสีเขียวจะเป็น 2 เท่าของสีเหลือง
การจัด layout ของ widget ที่อยู่ใน Row สามารถกำหนดค่าได้จาก mainAxisAlignment mainAxisSize crossAxisAlignment textBaseline โดยตัวอย่างจะใช้สีเหลืองแทนพื้นที่ของ Row ทั้งหมด ข้อความ 1 2 3 4 แทน widget ที่ขนาดไม่เท่ากันเอามาเรียงในรูปแบบต่าง ๆ โดยความสูงของ Row จะเท่ากับตัว widget ที่สูงที่สุด นั้นคือ 4
import 'package:flutter/material.dart';

void main() {
  runApp(MaterialApp(
      home: Scaffold(
          body:
          Container(
            color: Colors.yellow,
            child: Row(children: [
              Text('1', textScaler: TextScaler.linear(1)),
              Text('2', textScaler: TextScaler.linear(2)),
              Text('3', textScaler: TextScaler.linear(3)),
              Text('4', textScaler: TextScaler.linear(4)),
            ]),
  ))));
}

ผลจากการปรับค่าของ Row ในรูปแบบต่าง ๆ
Column เรียงตามแนวตั้ง
ตัว Column จะมีหลักการทำงานคล้ายกับ Row มาก โดยจะเปลี่ยนการเรียง widget จากแนวนอนเป็นแนวตั้งแทน ตัวอย่างจะใช้ของ Row แล้วเปลี่ยนเป็น Column แทน จะเห็นว่าตัว Column มีพื้นที่เต็มความสูงของ Parent
import 'package:flutter/material.dart';

void main() {
  runApp(MaterialApp(
      home: Scaffold(
          body: Container(
    color: Colors.yellow,
    child: Column(children: [
      Text('1', textScaler: TextScaler.linear(1)),
      Text('2', textScaler: TextScaler.linear(2)),
      Text('3', textScaler: TextScaler.linear(3)),
      Text('4', textScaler: TextScaler.linear(4)),
    ]),
  ))));
}
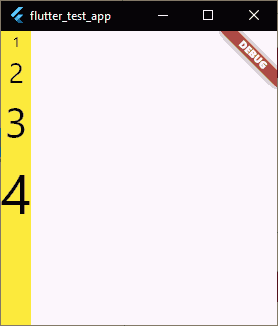
Column ที่ได้ ความกว้างจะกว้างเท่าเลข 4
หากต้องการกำหนดค่าอื่น ๆ จะคล้ายกับ Row แต่สลับเป็นแนวนอนแทน จะมีเฉพาะส่วนของ CrossAxisAlignment.baseline ที่ยังไม่ค่อยเข้าใจวิธีใช้ แต่มีตัวอย่างอยู่ใน StackOverflow โดยส่วนตัวคิดว่าไม่น่าจะได้ใช้

ผลของ Column เมื่อปรับค่าต่าง ๆ
Flexible และ Expanded
Flexible และ Expanded ต่างถูกใช้เพื่อระบุค่า flex สำหรับ Row Column และ Flex โดยมี constructor ดังนี้
const Flexible({
  Key? key,
  int flex = 1,
  FlexFit fit = FlexFit.loose,
  required Widget child,
})

const Expanded({
  Key? key,
  int flex = 1,
  required Widget child,
})
สิ่งที่ Flexible ต่างจาก Expanded คือ มันสามารถกำหนดได้ว่า จะให้ขนาดของ child มีขนาดเต็มที่หรือไม่ ผ่านการกำหนค่า fit
fit = FlexFit.loosewidget ใน child จะไม่ถูกบังคับให้ขยายขนาด (ค่าปริยาย)fit = FlexFit.tightwidget ใน child จะถูกขยายขนาดให้เต็ม มีผลเหมือนกับการใช้ Expanded
import 'package:flutter/material.dart';

void main() {
  runApp(MaterialApp(
      home: Scaffold(
          body: Container(
    color: Colors.yellow,
    child: Column(mainAxisSize: MainAxisSize.min, children: [
      Row(children: [
        Expanded(child: Test(Mode.expanded)),
        Expanded(child: Test(Mode.expanded)),
      ]),
      SizedBox(height: 2),
      Row(children: [
        Flexible(child: Test(Mode.flexible)),
        Expanded(child: Test(Mode.expanded)),
      ]),
      SizedBox(height: 2),
      Row(children: [
        Flexible(child: Test(Mode.flexible)),
        Flexible(fit: FlexFit.tight, child: Test(Mode.flexibleTight)),
      ]),
      SizedBox(height: 2),
      Row(children: [
        Flexible(child: Test(Mode.flexible)),
        Flexible(child: Test(Mode.flexible)),
      ]),
    ]),
  ))));
}

enum Mode { flexible, expanded, flexibleTight }

class Test extends StatelessWidget {
  final Mode mode;
  const Test(this.mode, {super.key});

  @override
  Widget build(BuildContext context) {
    switch (mode) {
      case Mode.flexible:
        return Container(color: Colors.grey, child: const Text('Flexible'));
      case Mode.expanded:
        return Container(color: Colors.green, child: const Text('Expanded'));
      case Mode.flexibleTight:
        return Container(color: Colors.cyan, child: const Text('Flexible(tight)'));
    }
  }
}
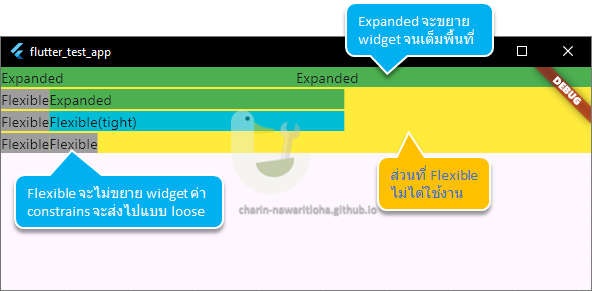
เปรียบเทียบระหว่าง Flexible กับ Expanded
Table ก็ตารางนั้นแหละ
ในกรณีที่ต้องการใช้ Row เพียง 1 แถว เพื่อเรียง widgets ก็สมเหตุสมผลที่จะใช้ Row แต่เมื่อไหร่ที่มี widget ที่ต้องเรียงต่อกันไปเกิน 1 แถว แนะนำว่าให้ใช้ Table สิ่งที่ Table ทำได้มีดังนี้
- กำหนดขนาดความกว้างของแต่ละช่อง ผ่าน defaultColumnWidth และ columnWidths
- กำหนดวิธีการวางในแนวตั้งได้ ผ่าน defaultVerticalAlignment
- กำหนดเส้นกรอบตารางได้ ผ่าน border
- ในแต่ละแถว ตัว widgets จะถูกบรรจุอยู่ใน TableRow สามารถตกแต่งแต่ละแถวอย่างอิสระด้วย decoration
constructor ของ Table
Table({
  Key? key,
  List<TableRow> children = const <TableRow>[],
  Map<int, TableColumnWidth>? columnWidths,
  TableColumnWidth defaultColumnWidth = const FlexColumnWidth(),
  TextDirection? textDirection,
  TableBorder? border,
  TableCellVerticalAlignment defaultVerticalAlignment = TableCellVerticalAlignment.top,
  TextBaseline? textBaseline,
})
การกำหนดความกว้างของคอลัมน์
ตัว Table ก็ใช้หลักการจัดความกว้างแบบเดียวกับ Row ผ่านคำสั่ง defaultColumnWidth เช่น ถ้าวางแผนว่าจะมี 3 คอลัมน์ ที่ขนาดเท่ากัน จะเขียนตามตัวอย่างต่อไปนี้
import 'dart:math';
import 'package:flutter/material.dart';

void main() {
  runApp(MaterialApp(
      home: Scaffold(
          body: Container(
              color: Colors.yellow,
              child: Table(
                children: [
                  TableRow(children: [Cell('Column11'), Cell('Column12'), Cell('Column13')]),
                  TableRow(children: [Cell('Column21'), Cell('Column22'), Cell('Column23')]),
                  TableRow(children: [Cell('Column31'), Cell('Column32'), Cell('Column33')])
                ],
              )))));
}

class Cell extends StatelessWidget {
  final String lable;
  const Cell(this.lable, {super.key});

  @override
  Widget build(BuildContext context) {
    Color bgColor = Color((Random().nextDouble() * 0xFFFFFF).toInt()).withOpacity(0.5);
    return Container(
      color: bgColor,
      child: Text(lable),
    );
  }
}
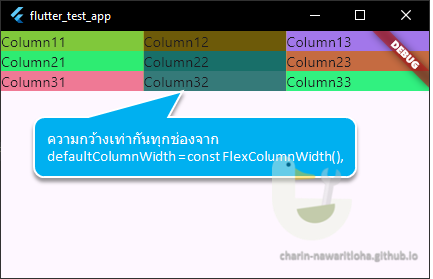
Table ที่ใช้ค่าเริ่มต้น ทุกช่องกว้างเท่ากันหมด
ค่าเริ่มต้นของ defaultColumnWidth จะเป็น FlexColumnWidth() ทุกช่องมีค่าเริ่มต้น flex=1 มาลองดูในรายละเอียดกัน
FlexColumnWidth()ทุกช่องค่า flex=1 ดังนั้นจะมีความกว้างเท่ากับทุกช่อง โดยจะใช้ความกว้างสูงสุดของ Table มาหารด้วยผลรวมของ flexFixedColumnWidth()กำหนดความกว้างเป็น pixel เช่นFixedColumnWidth(50.0)ทุกช่องจะกว้าง 50.0px แต่การกำหนดแบบนี้ถ้าผลรวมเกินความกว้างสูงสุดของ Table จะเกิดปัญหา OverflowFractionColumnWidth()กำหนดเป็นอัตราส่วนเมื่อเทียบกับความกว้างสูงสุดของ Table เช่นFractionColumnWidth(0.33)ทุกช่องจะกว้าง 33% ของความกว้าง TableMaxColumnWidth()กำหนดค่าสูงสุด 2 ค่า หากคำนวณแล้วค่าไหนมากกว่าจะใช้ค่านั้น เช่นMaxColumnWidth(FlexColumnWidth(), FixedColumnWidth(150))ถ้า Table กว้าง 300 มี 3 คอลัมน์FlexColumnWidth() → 100pxดังนั้นตัว render จะใช้FixedColumnWidth(150)MinColumnWidth()กำหนดค่าต่ำสุด 2 ค่า หากคำนวณแล้วค่าไหนน้อยกว่าจะใช้ค่านั้น เช่นMinColumnWidth(FlexColumnWidth(), FixedColumnWidth(150))ถ้า Table กว้าง 300 มี 3 คอลัมน์FlexColumnWidth() → 100pxดังนั้นตัว render จะใช้FlexColumnWidth()IntrinsicColumnWidth()ใช้ค่าขนาดของ widget ที่กว้างที่สุดในการกำหนดขนาดของแต่ละคอลัมน์ วิธีนี้แต่ละคอลัมน์จะปรับขนาดตาม widget ที่กว้างที่สุด ทำให้ใช้การประมวลผลมากที่สุด พิจารณาให้รอบคอบว่าจำเป็นต้องใช้จริง ๆ
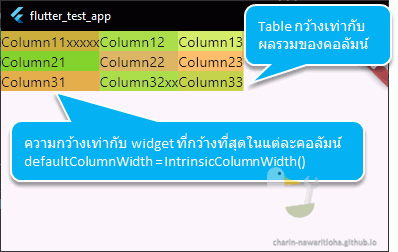
กำหนด defaultColumnWidth=IntrinsicColumnWidth()
สำหรับ MaxColumnWidth() กับ MinColumnWidth() เวลาใช้งานจริง อาจงง ๆ นิดหน่อย เช่น ต้องการกำหนดว่า
- คอลัมน์กว้างอย่างน้อย 150px จะใช้คำสั่ง
MaxColumnWidth(FlexColumnWidth(), FixedColumnWidth(150)) - คอลัมน์กว้างได้สูงสุดไม่เกิน 150px จะใช้คำสั่ง
MinColumnWidth(FlexColumnWidth(), FixedColumnWidth(150))
จากการทดสอบกับ Flutter 3.22.3 พบว่า MinColumnWidth(FlexColumnWidth(), FixedColumnWidth(150)) มีปัญหากับคำสั่ง FlexColumnWidth() ทำงานได้ไม่ถูกต้อง แต่หากใช้ FractionColumnWidth() จะทำงานถูกต้อง เช่น ถ้ามี 3 คอลัมน์ ก็ใช้ MinColumnWidth(FractionColumnWidth(1 / 3), FixedColumnWidth(150)) แทน แนะนำให้ตรวจสอบก่อนว่า issue นี้ได้ถูกแก้ไขหรือยัง
นอกจากการกำหนดด้วย defaultColumnWidth สามารถกำหนดเป็นรายคอลัมน์ที่ต้องการได้โดยใช้คำสั่ง columnWidths ข้อมูลที่จะใช้กำหนดขนาดความกว้างจะเป็น Map<int, TableColumnWidth> เช่น กำหนดให้คอลัมน์แรกมีขนาด 80px columnWidths: {0:FixedColumnWidth(80.0)}
Table(
  columnWidths: {0: FixedColumnWidth(80.0)},
  children: [
    TableRow(children: [Cell('Column11'), Cell('Column12'), Cell('Column13')]),
    TableRow(children: [Cell('Column21'), Cell('Column22'), Cell('Column23')]),
    TableRow(children: [Cell('Column31'), Cell('Column32'), Cell('Column33')])
  ])
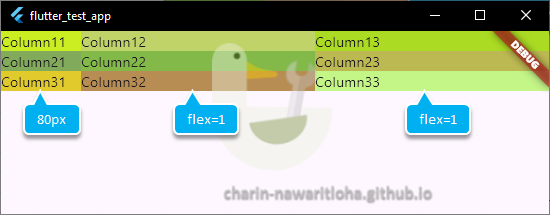
เฉพาะคอลัมน์แรกที่มีผลกับ columnWidths ที่เหลือใช้ค่า default ใช้ flex คำนวณ
หากต้องการกำหนดขนาดคอลัมน์ทุกอัน ก็สามารถระบุได้ตามความต้องการ ตัวอย่าง
- คอลัมน์ที่ 1 ขนาด 80.0
- คอลัมน์ที่ 2 ขนาด 150.0
- คอลัมน์ที่ 3 ขนาดพอดีกับ widget
Table(
  columnWidths: {0: FixedColumnWidth(80.0), 1: FixedColumnWidth(150.0), 2: IntrinsicColumnWidth()},
  children: [
    TableRow(children: [Cell('Column11'), Cell('Column12'), Cell('Column13')]),
    TableRow(children: [Cell('Column21'), Cell('Column22'), Cell('Column23')]),
    TableRow(children: [Cell('Column31'), Cell('Column32'), Cell('Column33')])
  ])
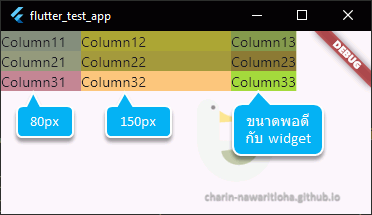
กำหนดขนาดทุกคอลัมน์
ใส่เส้นขอบ Table
TableBorder สำหรับระบุรูปแบบของเส้นขอบตาราง มี constructor 3 แบบ ดังนี้
const TableBorder({
  BorderSide top = BorderSide.none,
  BorderSide right = BorderSide.none,
  BorderSide bottom = BorderSide.none,
  BorderSide left = BorderSide.none,
  BorderSide horizontalInside = BorderSide.none,
  BorderSide verticalInside = BorderSide.none,
  BorderRadius borderRadius = BorderRadius.zero,
})

// A uniform border with all sides the same color and width. → best for lazy guy 😍
TableBorder.all({
  Color color = const Color(0xFF000000),
  double width = 1.0,
  BorderStyle style = BorderStyle.solid,
  BorderRadius borderRadius = BorderRadius.zero,
})

// Creates a border for a table where all the interior sides use the same styling and all the exterior sides use the same styling.
const TableBorder.symmetric({
  BorderSide inside = BorderSide.none,
  BorderSide outside = BorderSide.none,
  BorderRadius borderRadius = BorderRadius.zero,
})
ตัวอย่างการใส่เส้นตาราง TableBorder.all() เนื่องจากเส้นตารางมันทับกับขอบแอป เลยครอบด้วย Padding เพื่อให้เห็นเส้นชัดขึ้น
Padding(
  padding: const EdgeInsets.all(30.0),
  child: Table(
    border: TableBorder.all(),
    children: [
      TableRow(children: [Cell('Column11'), Cell('Column12'), Cell('Column13')]),
      TableRow(children: [Cell('Column21'), Cell('Column22'), Cell('Column23')]),
      TableRow(children: [Cell('Column31'), Cell('Column32'), Cell('Column33')])
    ]
))
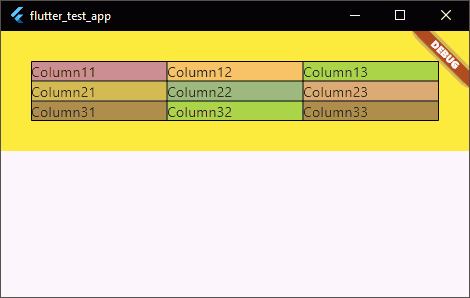
ใส่เส้นขอบตารางด้วย TableBorder.all()
border: TableBorder.all(
  width: 3.0,
  color: Colors.white,
  borderRadius: BorderRadius.all(Radius.circular(10.0)),
),
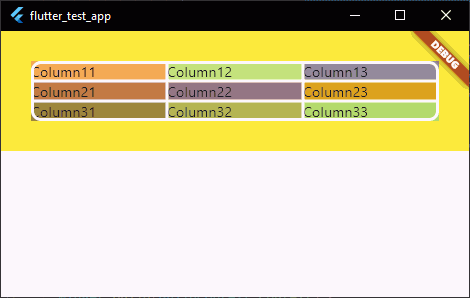
กำหนดความหนาของเส้นขอบ 3.0 สีขาว มุมโค้ง 10.0
ตกแต่ง TableRow
ในแต่ละ TableRow สามารถตกแต่งผ่านคำสั่ง decoration โดยใช้ Decoration ตัวอย่าง ลองใช้ BoxDecoration และ ShapeDecoration ในการตกแต่ง TableRow
- แถวที่ 1 สีพื้นหลังเขียว มีเส้นขอบสีดำ มุมโค้ง 5.0
- แถวที่ 2 สีพื้นหลังเป็นไล่เฉดจาก สีส้ม ไป ขาว
- แถวที่ 3 สีพื้นหลังขาว มีเส้นขอบ 2 ชั้น สีแดง กับ สีน้ำเงิน เส้นขอบหนา 2.0
import 'package:flutter/material.dart';

void main() {
  runApp(MaterialApp(
      home: Scaffold(
          body: Container(
              color: Colors.yellow,
              child: Padding(
                padding: const EdgeInsets.all(30.0),
                child: Table(
                  children: [

                    TableRow(
                      decoration: BoxDecoration(
                        color: Colors.green,
                        border: Border.all(),
                        borderRadius: BorderRadius.all(Radius.circular(5.0)),
                      ),
                      children: [Text('Column11'), Text('Column12'), Text('Column13')]),

                    TableRow(
                      decoration: BoxDecoration(
                        gradient: LinearGradient(colors: [Colors.orange, Colors.white])
                      ),
                      children: [Text('Column21'), Text('Column22'), Text('Column23')]),

                    TableRow(
                      decoration: ShapeDecoration(
                        color: Colors.white,
                        shape: Border.all(color: Colors.red, width: 2.0) +
                               Border.all(color: Colors.blue, width: 2.0)
                      ),
                      children: [Text('Column31'), Text('Column32'), Text('Column33')]),

                  ],
                ),
              )))));
}
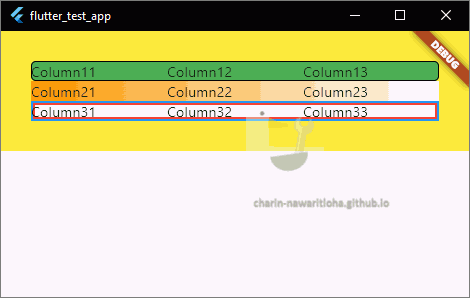
ผลจากการตกแต่ง TableRow