Dart: การใช้งาน Uri class เพื่อตีความและแก้ไข URI ต่าง ๆ
Uri class เป็น class ที่ออกแบบมาเพื่อช่วยตีความ URI รองรับการ encode และ decode ตัว String สำหรับ URI แบบต่าง ๆ เช่น
- https://example.org/api?foo=some_message
- https://john.doe@www.example.com:1234
- ftp://someserver.moc/folder/file.ext
- file:///D:/My%20Data/charin-nawaritloha.github.io/index.html
- ws://127.0.0.1/scoreboard
- mailto:John.Doe@example.com
- tel:+1-816-555-1212
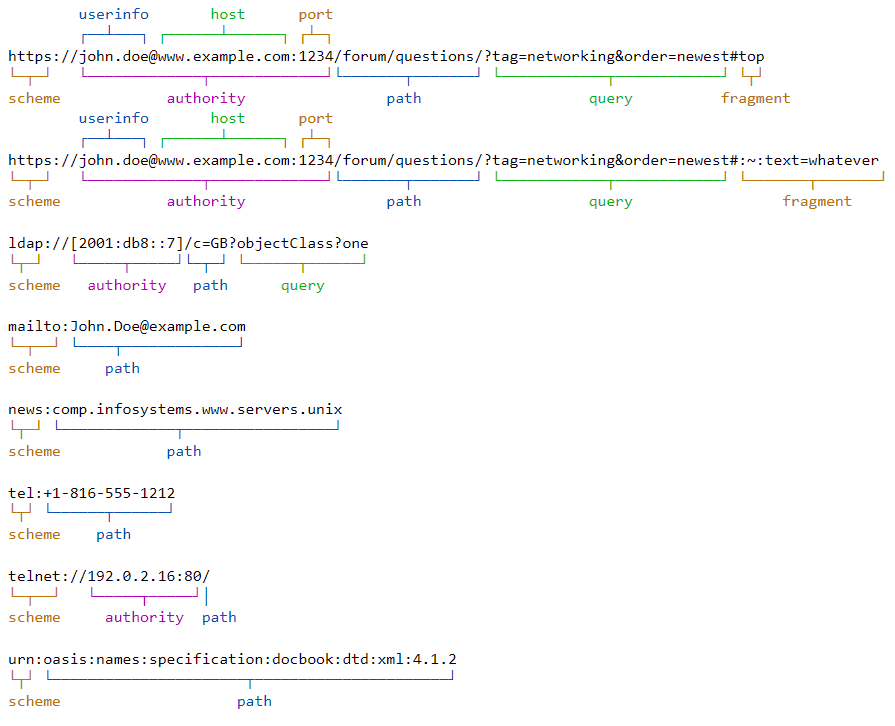
syntax diagram เพื่อใช้แยกส่วนประกอบของ URI จาก Wikipedia
การสร้าง Uri class
มี constructor ที่สามารถใช้งานได้ดังนี้
Uri()ใช้สำหรับสร้าง Uri ตาม scheme ที่กำหนด.http()สำหรับสร้าง Uri สำหรับ scheme → http.https()สำหรับสร้าง Uri สำหรับ scheme → https.file()สำหรับสร้าง Uri สำหรับ scheme → file.directory()สำหรับสร้าง Uri สำหรับ scheme → folder.dataFromBytes()สำหรับการเข้ารหัสข้อมูล binary เพื่อสร้างdata:โดยค่าปริยายของตัวเข้ารหัสจะเป็น Base64.dataFromString()สำหรับการเข้ารหัสข้อความเพื่อสร้างdata:โดยค่าปริยายของตัวเข้ารหัสจะเป็น percent-encoding
สำหรับ Uri() รองรับ parameter ดังนี้
Uri({
  String? scheme,
  String? userInfo,
  String? host,
  int? port,
  String? path,
  Iterable<String>? pathSegments,
  String? query,
  Map<String, dynamic>? queryParameters,
  String? fragment,
})
parameter ที่ระบุจะมีความหมายแต่ละ scheme ต่างกันไป ตัวอย่าง URI

ตัวอย่าง URIs จาก Wikipedia
ในการใช้งานจริง หากสร้าง Uri สำหรับ http https file directory อาจใช้ตัว constructor อื่น ๆ ที่ออกแบบมาสำหรับ scheme นั้น ๆ น่าจะสะดวกกว่า เนื่องจากจะมี parameter ที่ตรงกับข้อมูลที่จำเป็นในการสร้าง URI นั้นเลย
var httpsUri1 = Uri(scheme: 'https', host: 'abc123.com', path: 'images', queryParameters: {'id': 'test 123'});
print(httpsUri1); // output → https://abc123.com/images?id=test+123

var httpsUri2 = Uri.https('abc123.com', 'images', {'id': 'test 123'});
print(httpsUri2); // output → https://abc123.com/images?id=test+123
สร้าง Uri โดยการ parse จากข้อความด้วย .parse() .tryParse()
ทั้งสองคำสั่งเป็น static method ที่ทำงานแปลงข้อความเป็น URI เหมือนกัน สิ่งที่แตกต่างกัน คือ ในกรณีที่ไม่สามารถแปลงจากข้อความมาเป็น URI ได้ จะมีพฤติกรรมดังนี้
.parse()จะ throw FormatException กลับมา.tryParse()จะคืนค่ากลับมาเป็นnull
Uri myWeb = Uri.parse('https://myweb.io/documents/doc1.html?id=123#toc1');
print(myWeb.authority); // output → myweb.io
print(myWeb.path); // output → /documents/doc1.html
print(myWeb.queryParameters); // output → {id: 123}
print(myWeb.fragment); // output → toc1

Uri? unknow = Uri.tryParse('::Not valid URI::');
print(unknow); // output → null
การสร้าง Uri ใหม่จากการแก้ไขข้อมูลของ Uri เดิม
แทนที่ส่วนของ Uri ด้วย .replace()
เมื่อสร้าง Uri แล้ว หากต้องการจะแก้ไขเปลี่ยนแปลงข้อมูลบางส่วนของ Uri เพื่อสร้างเป็น Uri ใหม่ สามารถใช้คำสั่ง .replace() ในการใช้งาน ให้ระบุส่วนของ Uri ที่ต้องการแก้ไข ตัวคำสั่งจะคืน Uri ที่แทนที่ส่วนที่ระบุมาให้
Uri replace({
  String? scheme,
  String? userInfo,
  String? host,
  int? port,
  String? path,
  Iterable<String>? pathSegments,
  String? query,
  Map<String, dynamic>? queryParameters,
  String? fragment,
})
ตัวอย่าง สร้าง Uri ใหม่โดยเพิ่ม UserInfo เข้าไป
Uri myWeb = Uri.parse("https://web.io/");
Uri withUserInfo = myWeb.replace(userInfo: "admin");
print(withUserInfo); //output → https://admin@web.io/
ตัวอย่าง สร้าง Uri โดยลบส่วนของ path ออก
Uri myWeb = Uri.parse("https://web.io/path1/path2");
print(myWeb.path); //output → /path1/path2
Uri removePath = myWeb.replace(path: "");
print(removePath); //output → https://web.io
ลบส่วนของ fragment ทิ้งไปด้วย .removeFragment()
ลบส่วนของ fragment ใน URI ทิ้งไป ด้วยคำสั่ง .removeFragment() โดยจะลบ # ออกไปจาก URI ด้วย
Uri myWeb = Uri.parse("https://web.io/doc.html#toc1");
print(myWeb.fragment); //output → toc1

Uri removeFragment = myWeb.removeFragment();
print(removeFragment); //output → https://web.io/doc.html

Uri notOK = myWeb.replace(fragment: ""); // try to use replace()
print(notOK); //output → https://web.io/doc.html#
การเปลี่ยน path แบบ relative ด้วย .resolve()
คำสั่ง .resolve() จะช่วยคำนวณ path ใหม่ที่อ้างอิงตำแหน่งจากที่ระบุเข้าไป เช่น ของเดิมอยู่ที่ /path1/path11 แต่หากต้องการเปลี่ยนโดยอ้างอิงจาก ../path12 จะได้ผลดังนี้
/path1/path11+..→/path1/path1+path12→/path1/path12
Uri myWeb = Uri.parse("https://web.io/path1/path11/doc.html#toc1");
Uri newPath = myWeb.resolve("../path12/doc2.html");
print(newPath);//output → https://web.io/path1/path12/doc2.html
การแปลง file URI เป็นชื่อไฟล์บน Windows
หากต้องชื่อไฟล์ที่มาจาก URI ให้เป็นรูปแบบของ Windows ซึ่งใช้ \ ในการคั่นส่วนของ path สามารถใช้คำสั่ง .toFilePath() โดยกำหนดค่า windows: true
Uri myFile = Uri.parse("file:///C:/xxx/yyy");
print(myFile.toFilePath(windows: false)); // output → /C:/xxx/yyy
print(myFile.toFilePath(windows: true)); // output → c:\xxx\yyy
การสร้าง data URI scheme
.dataFromBytes() ใช้สำหรับงานแปลงข้อมูล binary เช่น ไฟล์ภาพ ออกมาเป็น data URI ที่ใช้ในการแทรกข้อมูลของภาพลงไปเลย ตัวอย่างเช่น การแทรกข้อมูลใน html ผ่าน <img src="..."> โดยใช้ภาพ svg มาแสดง
<img src="data:image/svg+xml;base64,PHN2ZyB4bWxucz0iaHR0cDovL3d3dy53My5vcmcvMjAwMC9zdmciIHdpZHRoPSI0OCIgaGVpZ2h0PSI0OCIgdmlld0JveD0iMCAwIDEyLjcgMTIuNyIgeG1sbnM6dj0iaHR0cHM6Ly92ZWN0YS5pby9uYW5vIj48ZGVmcz48bGluZWFyR3JhZGllbnQgaWQ9IkEiIHgxPSI4LjA4MiIgeTE9IjUuNTIiIHgyPSI4LjA4MiIgeTI9IjExLjc2MiIgZ3JhZGllbnRVbml0cz0idXNlclNwYWNlT25Vc2UiPjxzdG9wIG9mZnNldD0iMCIgc3RvcC1jb2xvcj0icmVkIi8+PHN0b3Agb2Zmc2V0PSIxIiBzdG9wLWNvbG9yPSJyZWQiIHN0b3Atb3BhY2l0eT0iMCIvPjwvbGluZWFyR3JhZGllbnQ+PC9kZWZzPjxwYXRoIGQ9Ik0uODg3LjkyaDYuNTM4djYuNjA0SC44ODd6IiBzdHJva2U9IiMwZjAiIHN0cm9rZS13aWR0aD0iLjI2NSIvPjxlbGxpcHNlIGN4PSI4LjA2NiIgY3k9IjguMjYzIiByeD0iNC4xMyIgcnk9IjMuOSIgZmlsbD0idXJsKCNBKSIgc3Ryb2tlPSIjZjlmOWY5IiBzdHJva2Utd2lkdGg9Ii4zMTciLz48L3N2Zz4=" width="200">
ผลที่ได้
ใน Dart สามารถเขียนเพื่ออ่านไฟล์ svg แล้วนำมาสร้างเป็น data URI ได้ดังนี้
File svg = File(r"D:\drawing.svg"); // the file store at D:\drawing.svg
Uint8List imgData = svg.readAsBytesSync();
Uri dataUri = Uri.dataFromBytes(imgData, mimeType: "image/svg+xml");
print('<img src="$dataUri" width="200">');
สำหรับการใช้งานอื่น ๆ สามารถดูได้จากตัวอย่างใน wikipedia
การ encoding decoding ข้อความที่เป็น URI
การ encode ตัว URI ที่เป็นข้อความธรรมดา ให้เป็นรูปแบบตามมาตรฐาน (ไม่มีตัวอักษรพิเศษ เช่น / : & #) ตัว Uri class มี static method ที่ช่วยในการแปลงข้อมูลให้
การ encode URI ในส่วนของ path และ query
ข้อความที่เป็น URL หากต้องการ encode ในส่วนของ path และ query สามารถใช้คำสั่ง .encodeFull() โดยข้อความจะถูกแปลงด้วยวิธีการ percent-encoding
String url1 = "https://myweb.io/ฟ20.html";
print(Uri.encodeFull(url1)); //? output → https://myweb.io/%E0%B8%9F20.html

String url2 = "https://myweb.io/query?t=a b c&id=10#h1";
print(Uri.encodeFull(url2)); //? output → https://myweb.io/query?t=a%20b%20c&id=10#h1
การ decode URI ในส่วนของ path และ query
อันนี้จะเป็นการแปลงข้อความที่ถูกเข้ารหัสด้วย percent-encoding กลับมาเป็นข้อความที่ใช้ตัวอักษรธรรมดา โดยใช้คำสั่ง .decodeFull()
String url1 = "https://myweb.io/%E0%B8%9F20.html";
print(Uri.decodeFull(url1)); //? output → https://myweb.io/ฟ20.html

String url2 = "https://myweb.io/query?t=a%20b%20c&id=10#h1";
print(Uri.decodeFull(url2)); //? output → https://myweb.io/query?t=a b c&id=10#h1
การ encode ทั้งข้อความ
หากต้องการ encode ทั้งข้อความ จะใช้คำสั่ง .encodeComponent()
String url1 = "https://myweb.io/ฟ20.html";
String component1 = Uri.encodeComponent(url1);
print(component1); //output → https%3A%2F%2Fmyweb.io%2F%E0%B8%9F20.html
print('<a href="https://go.to/?link=$component1">'); //output → <a href="https://go.to/?link=https%3A%2F%2Fmyweb.io%2F%E0%B8%9F20.html">
การ decode ทั้งข้อความ
การ decode ข้อความที่ถูกเข้ารหัสด้วย percent-encoding สามารถใช้คำสั่ง .decodeComponent()
String component1 = "https%3A%2F%2Fmyweb.io%2F%E0%B8%9F20.html";
String url1 = Uri.decodeComponent(component1);
print(url1); //output → https://myweb.io/ฟ20.html